The release of EPM 11.1.2 brought many changes across the product set and with the supporting architecture, gone was the ability to deploy web applications using Tomcat and only one option of WebLogic remained. This brought with it a much bigger footprint in terms of memory and pushed many down alternative paths to be able to run the system.
There are many reasons why high memory requirements can be restrictive, for instance if you wanted to run the full system for development, training, demos etc and intended on hosting on a laptop, yes it is possible if you pay for very high end spec machine or look to the cloud for inspiration but surely there were other possibilities.
With the release of 11.1.2.1 an additional option called compact deployment has become available which allows WebLogic based web applications to be deployed to a single managed server instead of a separate server for each product, so in theory reducing the overall memory requirement.
Today I am going to go through the process of deploying using the compact server method, now there are a few things to be aware of first.
Now I am not going to go through how to install EPM 11.1.2.1 as I have covered that in the past and it’s not the purpose of this blog, I am starting off with a fresh install of EPM 11.1.2.1 deployed on a windows 2008 R2 64bit machine, the process covered today should be pretty much the same for other operating systems and if it is unix type system then it will just be a matter of running a .sh instead of .bat
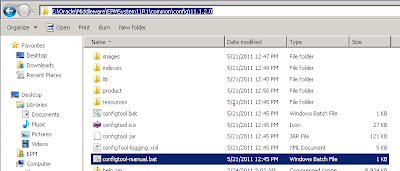
Before deploying the web applications the other areas for each product such as database configurations have to be carried out first, so the configurator was started using <MIDDLEWARE_HOME>/EPMSystem11R1common/config/11.1.2.0/config-manual.bat
Usually the configurator is started using configtool.bat but using configtool-manual.bat starts the configurator as if the web applications are to be deployed manually, this means there will be no options available for web application deployment.
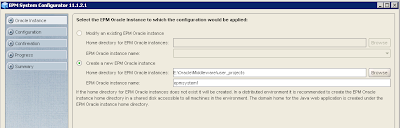
As this a fresh install a new EPM Oracle instance has to be created, I stuck with the defaults which creates an instance with the name of epmsystem1, the instance name is required later in the process.
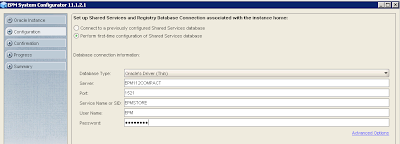
The first-time configuration option is selected and details of the database are entered, this will only have to be entered once as all products are going to be deployed using one database.
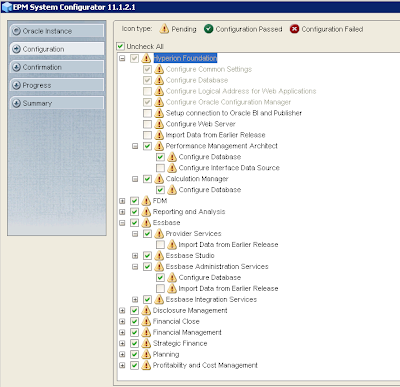
All the required options will already be selected notice that there are no options available to deploy to application server.
It is also worth noting that the essbase server configuration option is not available either, now you can leave configuring essbase until later or do what I did and configure all the above first and then run configtool.cmd, deselect all and only select Essbase > “Configure Essbase Server”.
Once all the products have been configured then it is time to move on to the web applications compact deployment.

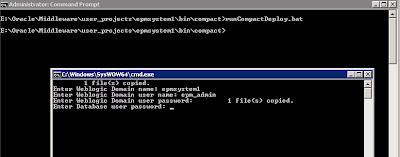
To start up the compact deployment open a command prompt and go to <MIDDLEWARE_HOME>/user_projects/epmsystem1/bin/compact and execute “runCompactDeploy.bat”
Four pieces of information are required:-
Weblogic Domain name – this should be the same name as the domain name created in the EPM configurator, the default being EPMSystem (though I used epmsystem1 as the domain name in my example as it was a fresh install with no domain created)
Weblogic Domain user name/password – I stuck with the default username used when configuring EPM which is epm_admin and the password is your choice, you will need these account details if you intend on logging into the WebLogic admin console for the domain.
Database user password – this is the password of the account used for configuring the one database in the configurator.
Once entered the compact deployment should spring into life and all should be good…
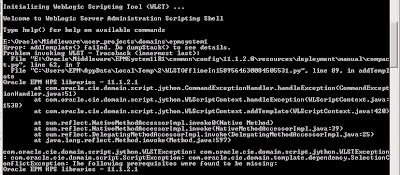
Unfortunately I hit a bit of an issue and thought I would explain why it happened as I am sure I won’t be the only one that gets hit with it.
The compact deployment ran through and by watching the command window intently I noticed errors appear and in the end was awarded with a pop up message stating startEPMSystem.bat did not exist.
The problem started to manifest when a WebLogic script is executed to create the domain and add the EPM library templates.
The exception was “The following prerequisites were found to be missing: Oracle EPM HPS libraries – 11.1.2.1”
It seems that there are a number of mandatory products that need to be installed before the compact deployment can be carried out.
I found the details of the required libraries in the following file which is used in the compact deployment -
<MIDDLEWARE_HOME>/EPMSystem11R1/common/templates/compact/epm_system_11.1.2.1.jar
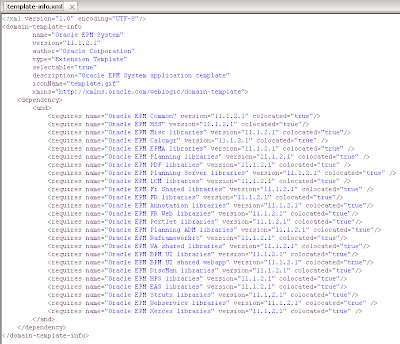
Within the jar is a file named template-info.xml which contains the required libraries, the libraries are located at <MIDDLEWARE_HOME>/EPMSystem11R1/common/templates/applications
It looks like the following products may need to installed before running the compact deployment –
Foundation
Disclosure Management
Reporting and Analysis Framework
EAS
ERPi
Planning
Financial Reporting
Web Analysis
HPS (Hyperion Performance Scorecard)
So depending on what products have been installed will determine the exception generated, in my case the only product I had not installed was Performance Scorecard and that is why the error around “Oracle EPM HPS libraries – 11.1.2.1” was being generated.
It may be possible to update the xml file to alter the dependencies but it is not something I have attempted. (Update: it is possible and I have wrote a post on how to do it, have a read here)
This left me the only option to install Performance scorecard and then configured the non web app elements.
Once complete “runCompactDeploy.bat” was executed again.
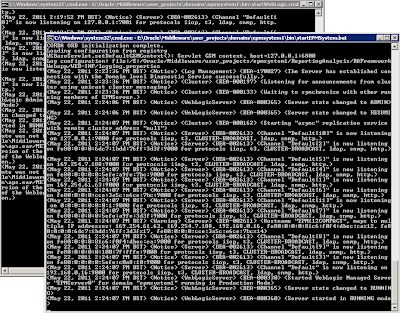
This time everything ran smoothly and no errors were generated in the compactDeploy window, once completed another command window opens and starts up the WebLogic admin server for epmsystem1, a final command window opened starting up all the EPM web applications in one managed WebLogic server by executing <MIDDLEWARE_HOME>/user_projects/domains/epmsystem1/bin/startEPMSystem.bat
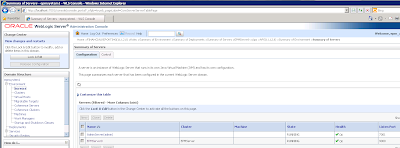
If you log into the WebLogic admin console for the epmsystem1 domain you will notice a server has been created called “EPMServer0” running on port 9000, this means all the EPM web application will be running against that port.
To log in to the admin console go to http://localhost:7001/console and enter the username/password that was entered earlier when running the compact deployment batch script
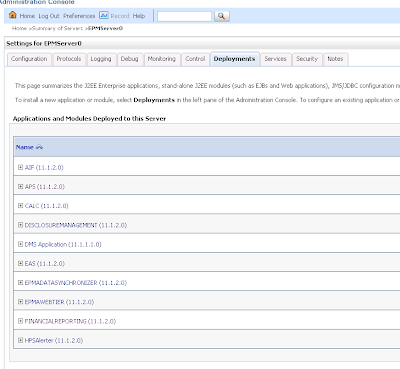
To view all the web applications deployed in the managed server click on “EPMServer0” and go to deployments tab.
The admin server can be stopped to save memory as it is not required and the "EPMServer0" managed server can be run indepently.
It is possible to test logging into some of the products using port 9000 but for all the products to communicate correctly through workspace the final step was to configure the http web server element.
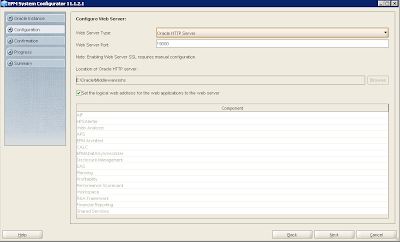
Once the web server was successfully configured using OHS the web applications were all accessible via port 19000
To start the managed server execute - <MIDDLEWARE_HOME>/user_projects/domains/epmsystem1/bin/startEPMSystem.bat
To stop the managed server execute - <MIDDLEWARE_HOME>/user_projects/domains/epmsystem1/bin/stopEPMSystem.bat
No windows service is created by default to start/stop the managed server, I am sure it is possible to create one and maybe it is something I will have a look at if I ever get the chance.
(Update: the steps to create a windows service can be found here)
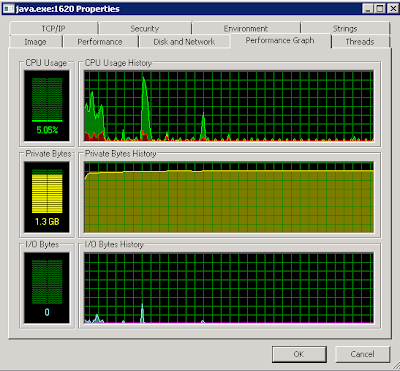
A quick look at the Java process running the WebLogic managed server indicated the minimum memory being consumed was 1.3GB, so if you compared that to starting the entire set of EPM web applications in a standard deployment then there is a considerable difference, starting up just “Foundation” and “R&A Framework” web applications can consume around 1GB.
Depending on the available memory on the machine being deployed on the JVM maximum memory can be increased and with it being 64bit then there is less of a constraint on an upper limit like with 32bit.
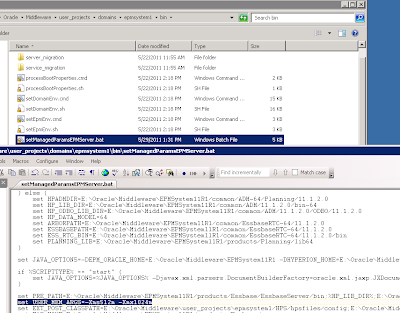
To increase the JVM edit <MIDDLEWARE_HOME>/user_projects/domains/epmsystem1/bin/setManagedParamsEPMServer.bat and update the value for -Xmx then restart the managed server.
I have not had a chance to really put the system through its paces but the performance seems reasonable considering what it will be used for, I recommend you try it out and make up your own opinion but at least it opens the door for deployments on machines with a lower memory capacity.
There are many reasons why high memory requirements can be restrictive, for instance if you wanted to run the full system for development, training, demos etc and intended on hosting on a laptop, yes it is possible if you pay for very high end spec machine or look to the cloud for inspiration but surely there were other possibilities.
With the release of 11.1.2.1 an additional option called compact deployment has become available which allows WebLogic based web applications to be deployed to a single managed server instead of a separate server for each product, so in theory reducing the overall memory requirement.
Today I am going to go through the process of deploying using the compact server method, now there are a few things to be aware of first.
- It is aimed at 64bit operating systems.
- Is available for new/upgraded 11.1.2.1 installations.
- Financial Management and Financial Close management are not included; these will still need to be deployed using the standard deployment method, though saying that it is still possible to use a large percentage of FM functionality without the WebLogic piece running.
- If the managed server crashes for any reason then all the web application running within it will be taken down.
- This deployment method should not be considered for anything more than a development environment, it wouldn’t be supported either.
Now I am not going to go through how to install EPM 11.1.2.1 as I have covered that in the past and it’s not the purpose of this blog, I am starting off with a fresh install of EPM 11.1.2.1 deployed on a windows 2008 R2 64bit machine, the process covered today should be pretty much the same for other operating systems and if it is unix type system then it will just be a matter of running a .sh instead of .bat

Before deploying the web applications the other areas for each product such as database configurations have to be carried out first, so the configurator was started using <MIDDLEWARE_HOME>/EPMSystem11R1common/config/11.1.2.0/config-manual.bat
Usually the configurator is started using configtool.bat but using configtool-manual.bat starts the configurator as if the web applications are to be deployed manually, this means there will be no options available for web application deployment.

As this a fresh install a new EPM Oracle instance has to be created, I stuck with the defaults which creates an instance with the name of epmsystem1, the instance name is required later in the process.

The first-time configuration option is selected and details of the database are entered, this will only have to be entered once as all products are going to be deployed using one database.

All the required options will already be selected notice that there are no options available to deploy to application server.
It is also worth noting that the essbase server configuration option is not available either, now you can leave configuring essbase until later or do what I did and configure all the above first and then run configtool.cmd, deselect all and only select Essbase > “Configure Essbase Server”.
Once all the products have been configured then it is time to move on to the web applications compact deployment.


To start up the compact deployment open a command prompt and go to <MIDDLEWARE_HOME>/user_projects/epmsystem1/bin/compact and execute “runCompactDeploy.bat”
Four pieces of information are required:-
Weblogic Domain name – this should be the same name as the domain name created in the EPM configurator, the default being EPMSystem (though I used epmsystem1 as the domain name in my example as it was a fresh install with no domain created)
Weblogic Domain user name/password – I stuck with the default username used when configuring EPM which is epm_admin and the password is your choice, you will need these account details if you intend on logging into the WebLogic admin console for the domain.
Database user password – this is the password of the account used for configuring the one database in the configurator.
Once entered the compact deployment should spring into life and all should be good…

Unfortunately I hit a bit of an issue and thought I would explain why it happened as I am sure I won’t be the only one that gets hit with it.
The compact deployment ran through and by watching the command window intently I noticed errors appear and in the end was awarded with a pop up message stating startEPMSystem.bat did not exist.
The problem started to manifest when a WebLogic script is executed to create the domain and add the EPM library templates.
The exception was “The following prerequisites were found to be missing: Oracle EPM HPS libraries – 11.1.2.1”
It seems that there are a number of mandatory products that need to be installed before the compact deployment can be carried out.
I found the details of the required libraries in the following file which is used in the compact deployment -
<MIDDLEWARE_HOME>/EPMSystem11R1/common/templates/compact/epm_system_11.1.2.1.jar

Within the jar is a file named template-info.xml which contains the required libraries, the libraries are located at <MIDDLEWARE_HOME>/EPMSystem11R1/common/templates/applications
It looks like the following products may need to installed before running the compact deployment –
Foundation
Disclosure Management
Reporting and Analysis Framework
EAS
ERPi
Planning
Financial Reporting
Web Analysis
HPS (Hyperion Performance Scorecard)
So depending on what products have been installed will determine the exception generated, in my case the only product I had not installed was Performance Scorecard and that is why the error around “Oracle EPM HPS libraries – 11.1.2.1” was being generated.
It may be possible to update the xml file to alter the dependencies but it is not something I have attempted. (Update: it is possible and I have wrote a post on how to do it, have a read here)
This left me the only option to install Performance scorecard and then configured the non web app elements.
Once complete “runCompactDeploy.bat” was executed again.

This time everything ran smoothly and no errors were generated in the compactDeploy window, once completed another command window opens and starts up the WebLogic admin server for epmsystem1, a final command window opened starting up all the EPM web applications in one managed WebLogic server by executing <MIDDLEWARE_HOME>/user_projects/domains/epmsystem1/bin/startEPMSystem.bat

If you log into the WebLogic admin console for the epmsystem1 domain you will notice a server has been created called “EPMServer0” running on port 9000, this means all the EPM web application will be running against that port.
To log in to the admin console go to http://localhost:7001/console and enter the username/password that was entered earlier when running the compact deployment batch script

To view all the web applications deployed in the managed server click on “EPMServer0” and go to deployments tab.
The admin server can be stopped to save memory as it is not required and the "EPMServer0" managed server can be run indepently.

It is possible to test logging into some of the products using port 9000 but for all the products to communicate correctly through workspace the final step was to configure the http web server element.

Once the web server was successfully configured using OHS the web applications were all accessible via port 19000
To start the managed server execute - <MIDDLEWARE_HOME>/user_projects/domains/epmsystem1/bin/startEPMSystem.bat
To stop the managed server execute - <MIDDLEWARE_HOME>/user_projects/domains/epmsystem1/bin/stopEPMSystem.bat
No windows service is created by default to start/stop the managed server, I am sure it is possible to create one and maybe it is something I will have a look at if I ever get the chance.
(Update: the steps to create a windows service can be found here)

A quick look at the Java process running the WebLogic managed server indicated the minimum memory being consumed was 1.3GB, so if you compared that to starting the entire set of EPM web applications in a standard deployment then there is a considerable difference, starting up just “Foundation” and “R&A Framework” web applications can consume around 1GB.

Depending on the available memory on the machine being deployed on the JVM maximum memory can be increased and with it being 64bit then there is less of a constraint on an upper limit like with 32bit.
To increase the JVM edit <MIDDLEWARE_HOME>/user_projects/domains/epmsystem1/bin/setManagedParamsEPMServer.bat and update the value for -Xmx then restart the managed server.
I have not had a chance to really put the system through its paces but the performance seems reasonable considering what it will be used for, I recommend you try it out and make up your own opinion but at least it opens the door for deployments on machines with a lower memory capacity.


