I have previously written a couple of posts around FDMEE Web Services and at the time of writing them the options for on-premise did not include any RESTful services.
The first part covered Web Services available in FDMEE using the SOAP protocol which requires the arduous task of configuring Oracle Web Services Manager (OWSM), the amount of effort involved has never made this a viable option and personally I prefer REST over SOAP for ease of use.
The post also covered an alternative way of executing processes in FDMEE by calling a Java Servlet which behind the scenes is basically the same method the command batch scripts use.
In the second part I went through the REST resources available at the time for Data Management in PBCS.
With the release of FDMEE 11.1.2.4.210 many of the EPM cloud features have finally been pushed down to on-premise, the readme for the FDMEE 210 PSU does not include any reference to the REST API and the full documentation is yet to be released.
The good news is that the REST API has made its way down to on-premise and since I wrote the original piece on the cloud there have been some additional resources added to the API.
I feel this is a good opportunity to go through what is available in terms of the REST API for both on-premise and cloud.
In this first part I will show how simple it is to execute data load rules and batches using the REST API, now I did cover this previously for the cloud and it is pretty much the same principal for on-premise but I thought I would go over it again to clear any confusion.
In the examples I will use a REST Client (boomerang for Chrome) and for scripting PowerShell, I have said this before but I have only picked them because I find them easy to use and good for demonstration purposes, the beauty is there are many different clients and scripting languages that can take advantage of REST so just use the one you are most comfortable with.
The URL structure for accessing the REST resources is:
http(s)://<webserver>:<port>/aif/rest/<api_version>/<path>
The API version is currently V1 for both cloud and on-premise
The path identifies the resource and for running rules and batches the path is jobs
To test the resources are accessible using a REST client a GET request can be made to:
http(s)://<webserver>:<port>/aif/rest/V1

Before sending, the header of the request will require authentication information containing the username and password of a provisioned FDMEE user.

The REST client automatically encodes the credentials into base64 and adds them as a basic authorization header.


So let us go through an example of running an FDMEE data load rule.
I have the following data load rule which has a source file and target planning application.

Another of the new features in the 210 PSU is the ability to load non numeric data, once again I have covered this is in the cloud but this is a good time to test out the functionality for on-premise FDMEE.
In the target options of the load rule there is the option to set the load method to “All Data Types” and the date format for date data.

For this example, I have created a Text, Date and Smart List member in the target planning application.

The source file has the three members and data with the equivalent data type

There is also a form to verify that the non-numeric data has been loaded correctly.

Now that everything is in place I can look at using the REST resource to execute the load rule.
The resource uses a POST method and has a number of input parameters which are required to be in JSON format in the body of the request.
The parameters are:
jobType which for load rules will always be “DATARULE”
jobName will be the name of the data load rule.
startPeriod will be the first period for the data.
endPeriod will be the last period the data.
importMode defines how the data is imported into FDMEE. the possible values are: APPEND, REPLACE, RECALCULATE, NONE
exportMode defines how the data is loaded into the target application, the possible values depend on the target application.
For planning these are STORE_DATA, ADD_DATA, SUBSTRACT_DATA, REPLACE_DATA, NONE
If your target application is HFM then is where you hit an issue, as the REST resources have been pushed down from the cloud and there is no HFM in the cloud then all export options are not available, well I think they are not there, I will update this post if I find them or if anything changes.
The available values are REPLACE, MERGE, NONE.
This means that accumulate and replace by security are not there, if you need to use those export values then as a workaround you can create a batch in FDMEE and use the REST resource to run the batch.
fileName (optional) if not supplied the file which is defined in the data load rule will be used.
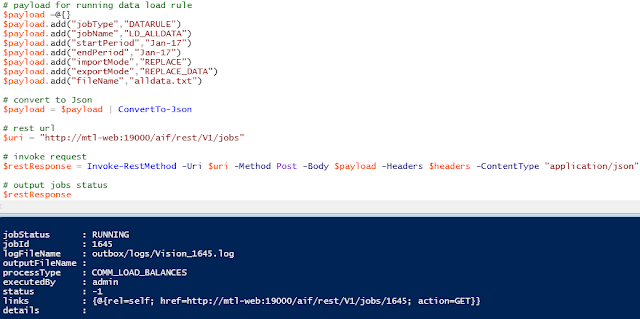
For the data load rule I am going to execute the parameters translate into the following:

The request can be sent and a response will be returned with parameters and values in JSON format which provide information about the job.

The jobID parameter is the equivalent to the process ID in FDMEE.
jobStatus will contain either “RUNNING”, “SUCCESS”, “FAILED”
status will be one of the following values: -1 = in progress; 0 = success; 1 = error; 2 = cancel pending; 3 = cancelled; 4 = invalid parameter
The job status has been returned as running, to keep checking the status a GET request can be made to the URL held in the href parameter.

The job status has now been returned as “SUCCESS” so the full process is complete.
If the job ID is removed from the URL then all job statuses will be returned.
If you take a look in process details in the FDMEE UI then you can see that the process ID and job ID do match and the status is the same.

Back to my form in planning and the non-numeric data has been loaded correctly, so that is two pieces of new functionality tested in one go.

Converting this into a script is a simple task, with not much effort and a small amount of code an FDMEE data load rule can be executed.
To keep checking the status the URL in the returned href parameter can be stored and then a request made using the URL.

So now rules can be easily executed using the REST API.
I know I am going to get asked about uploading files to the FDMEE directory because it is possible using REST in the cloud, currently this is not possible as the upload/download functionality in the cloud uses the migration REST API and this has not made it down to on-premise, I am not sure if it will or not because of the difference between the directory structure in the cloud compared to on-premise, we will see.
Really it shouldn’t be too much of a problem though with on-premise as the FDMEE directories are on a file system so there are many ways to transfer files using scripting languages.
Moving on to the next REST resource and that is the ability to run batches.
For my example I have the following batch created which just executes the same load rule as the previous example.

The REST resource for running batches is the same URL as for running data loads and once again with a POST method.
Only a couple of input parameters are required in the body of the request to the resource.
jobType which for load rules will always be “BATCH”
jobName will be the name of the batch.
For my example this translates to the following request in the REST client:

Just like with the data rule a response is returning containing all the job information.

The response will only contain the details of the main batch process and not the ID of the jobs that are part of the batch, this is not really a problem as you would only really be interested in the status of the overall batch process.

As the job ID of the batch is returned and you will already know the order of the jobs then you could easily check the details of each of the jobs in the batch.

In terms of scripting then the code would be pretty much similar to running a data load and the only difference being less parameters are required in the body of the request.

Using a script is also nice and simple way of monitoring the status of FDMEE processes without having to log into the UI.

One thing that would be beneficial that is not included in the REST responses is the start and end times of the processes, maybe Oracle will include them at some point in the future.
Right, I am going to leave it there for today and in the next part I will cover importing/exporting mappings and running reports using REST.
The first part covered Web Services available in FDMEE using the SOAP protocol which requires the arduous task of configuring Oracle Web Services Manager (OWSM), the amount of effort involved has never made this a viable option and personally I prefer REST over SOAP for ease of use.
The post also covered an alternative way of executing processes in FDMEE by calling a Java Servlet which behind the scenes is basically the same method the command batch scripts use.
In the second part I went through the REST resources available at the time for Data Management in PBCS.
With the release of FDMEE 11.1.2.4.210 many of the EPM cloud features have finally been pushed down to on-premise, the readme for the FDMEE 210 PSU does not include any reference to the REST API and the full documentation is yet to be released.
The good news is that the REST API has made its way down to on-premise and since I wrote the original piece on the cloud there have been some additional resources added to the API.
I feel this is a good opportunity to go through what is available in terms of the REST API for both on-premise and cloud.
In this first part I will show how simple it is to execute data load rules and batches using the REST API, now I did cover this previously for the cloud and it is pretty much the same principal for on-premise but I thought I would go over it again to clear any confusion.
In the examples I will use a REST Client (boomerang for Chrome) and for scripting PowerShell, I have said this before but I have only picked them because I find them easy to use and good for demonstration purposes, the beauty is there are many different clients and scripting languages that can take advantage of REST so just use the one you are most comfortable with.
The URL structure for accessing the REST resources is:
http(s)://<webserver>:<port>/aif/rest/<api_version>/<path>
The API version is currently V1 for both cloud and on-premise
The path identifies the resource and for running rules and batches the path is jobs
To test the resources are accessible using a REST client a GET request can be made to:
http(s)://<webserver>:<port>/aif/rest/V1
Before sending, the header of the request will require authentication information containing the username and password of a provisioned FDMEE user.
After sending the request, a valid response should contain the REST API version information in JSON format.
So let us go through an example of running an FDMEE data load rule.
I have the following data load rule which has a source file and target planning application.

Another of the new features in the 210 PSU is the ability to load non numeric data, once again I have covered this is in the cloud but this is a good time to test out the functionality for on-premise FDMEE.
In the target options of the load rule there is the option to set the load method to “All Data Types” and the date format for date data.
For this example, I have created a Text, Date and Smart List member in the target planning application.
The source file has the three members and data with the equivalent data type
There is also a form to verify that the non-numeric data has been loaded correctly.
Now that everything is in place I can look at using the REST resource to execute the load rule.
The resource uses a POST method and has a number of input parameters which are required to be in JSON format in the body of the request.
The parameters are:
jobType which for load rules will always be “DATARULE”
jobName will be the name of the data load rule.
startPeriod will be the first period for the data.
endPeriod will be the last period the data.
importMode defines how the data is imported into FDMEE. the possible values are: APPEND, REPLACE, RECALCULATE, NONE
exportMode defines how the data is loaded into the target application, the possible values depend on the target application.
For planning these are STORE_DATA, ADD_DATA, SUBSTRACT_DATA, REPLACE_DATA, NONE
If your target application is HFM then is where you hit an issue, as the REST resources have been pushed down from the cloud and there is no HFM in the cloud then all export options are not available, well I think they are not there, I will update this post if I find them or if anything changes.
The available values are REPLACE, MERGE, NONE.
This means that accumulate and replace by security are not there, if you need to use those export values then as a workaround you can create a batch in FDMEE and use the REST resource to run the batch.
fileName (optional) if not supplied the file which is defined in the data load rule will be used.
For the data load rule I am going to execute the parameters translate into the following:
The request can be sent and a response will be returned with parameters and values in JSON format which provide information about the job.
The jobID parameter is the equivalent to the process ID in FDMEE.
jobStatus will contain either “RUNNING”, “SUCCESS”, “FAILED”
status will be one of the following values: -1 = in progress; 0 = success; 1 = error; 2 = cancel pending; 3 = cancelled; 4 = invalid parameter
The job status has been returned as running, to keep checking the status a GET request can be made to the URL held in the href parameter.
The job status has now been returned as “SUCCESS” so the full process is complete.
If the job ID is removed from the URL then all job statuses will be returned.
If you take a look in process details in the FDMEE UI then you can see that the process ID and job ID do match and the status is the same.

Back to my form in planning and the non-numeric data has been loaded correctly, so that is two pieces of new functionality tested in one go.
Converting this into a script is a simple task, with not much effort and a small amount of code an FDMEE data load rule can be executed.
To keep checking the status the URL in the returned href parameter can be stored and then a request made using the URL.

So now rules can be easily executed using the REST API.
I know I am going to get asked about uploading files to the FDMEE directory because it is possible using REST in the cloud, currently this is not possible as the upload/download functionality in the cloud uses the migration REST API and this has not made it down to on-premise, I am not sure if it will or not because of the difference between the directory structure in the cloud compared to on-premise, we will see.
Really it shouldn’t be too much of a problem though with on-premise as the FDMEE directories are on a file system so there are many ways to transfer files using scripting languages.
Moving on to the next REST resource and that is the ability to run batches.
For my example I have the following batch created which just executes the same load rule as the previous example.
The REST resource for running batches is the same URL as for running data loads and once again with a POST method.
Only a couple of input parameters are required in the body of the request to the resource.
jobType which for load rules will always be “BATCH”
jobName will be the name of the batch.
For my example this translates to the following request in the REST client:
Just like with the data rule a response is returning containing all the job information.
The response will only contain the details of the main batch process and not the ID of the jobs that are part of the batch, this is not really a problem as you would only really be interested in the status of the overall batch process.

As the job ID of the batch is returned and you will already know the order of the jobs then you could easily check the details of each of the jobs in the batch.
In terms of scripting then the code would be pretty much similar to running a data load and the only difference being less parameters are required in the body of the request.

Using a script is also nice and simple way of monitoring the status of FDMEE processes without having to log into the UI.
One thing that would be beneficial that is not included in the REST responses is the start and end times of the processes, maybe Oracle will include them at some point in the future.
Right, I am going to leave it there for today and in the next part I will cover importing/exporting mappings and running reports using REST.


