In the last part I went through an example solution to build a custom scheduler which could be accessed through the FDMEE UI, it was created using a combination of jython and the ODI Java API, the post covered in detail the process to create a new batch schedule but could easily be adapted to schedule data and metadata load rules or custom scripts.
In this post I want to continue where I left off and move on to updating, deleting and viewing active schedules, also look at the possibilities of running these tasks outside of the FDMEE UI.
Let us start off with updating an existing schedule, a custom script was registered which has parameters defined to select the schedule, set the start and end dates and repetition in minutes or hours. These parameters will be displayed when the custom script is executed and then passed into the jython script which will then update the schedule.

The parameter “SCHEDULE_ID” has been defined to call a query called “Batch Info”, this SQL query is against the ODI repository which hold the scheduling information, the query has been defined to return an understandable description and the ODI internal ID for the schedule, this ID is important as it will be used with the ODI Java API to access the selected schedule.

You will see the query in action when I execute the custom script which now appears in the UI under the “Custom Batch Scheduler” group it has been assigned to.

Executing the “Update Batch Schedule” script displays a window with the parameters that were defined in the script registration.

Now if select the schedule to update the SQL query comes into action and the script name, start to end date, repetition and schedule ID are displayed ready for selection.

It would be nice if there was the functionality to base a SQL query on the results of a SQL query but unfortunately that is not yet available in FDMEE so the remaining input fields need to input manually, as the schedule is being updated this is not much of an issue because you would need to enter new values anyway.

Now the new schedule information has been entered the script can be run and a custom message is displayed if the update was successful.

The process logs also display the status of executing the custom script.

The FDMEE log associated with the process contains the updated schedule information.

To prove the schedule has been updated I can switch over to the ODI console where it should have a new start date of 20th of August at 8am.

As I explained in the last part the end date has to be calculated and set as a maximum cycle duration, the execution cycle includes the interval between repetitions which correctly matches the value entered when running the custom script.

To prove the scheduling information had been update correctly I could have also just run the update schedule custom script again and selected the option to return the active schedules, this would have returned the updated values from the ODI repository.

What you do need to watch out for with populating parameter value fields is there is currently a 50-character limit, the SQL will return no problem, for example

As the above text is are over 50 characters then after selecting you would be hit with an unfriendly ADF error.

The magic to update the schedule is all handled in the jython script, the script follows the same concept as what I went through in the last part so there is no need for me to show all the script again.
The parameters values are stored, the schedule duration is calculated by finding the difference in minutes between the start and end date.

A connection is made to the ODI repository and then the schedule is returned by searching based on the ID that was passed into the script.
The values of the schedule are then updated to the ones defined when running the script, these values are then committed and the agent schedule updated.

So that is creating and updating schedules covered off, on to deleting a schedule.
Once again a custom script is registered, this time there is only the requirement for one parameter and that is to select the schedule to delete, the query is exactly the same as the one used in the update script.
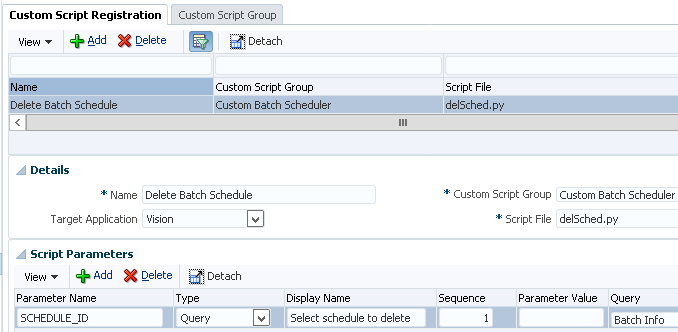
After the script has been registered, it is available in script execution under the group which it was registered to.

When the script is executed there is one parameter available to select the schedule to delete.

Selecting the magnifying glass will run the SQL query to run all the active batch schedules.

I selected the first schedule in the list to be deleted.

A custom message is displayed if the delete was successful.

If I run the script again and view the schedules it confirms the schedule has definitely been deleted.

The jython script is much simpler this time as all that is required is to retrieve the ID of the schedule from the custom script parameter values, connect to the ODI repository, find the schedule by the ID, delete the schedule, commit and then update the ODI agent scheduler.

Just to recap that means with the custom scheduler solution we have the ability to create, update and delete schedules.
So how about viewing the active schedules, well you can certainly run the custom scripts like I have already shown to display the schedules but personally I don’t feel like is the nicest solution, what I did to overcome this was to create a report in FDMEE.
Before creating a report a SQL query was created and registered, the query was similar to one used in the update/delete scripts.

The query produces the following output that be used in the FDMEE report.

Once the query validated the generate XML button was selected, this produces an XML file which can be loaded into word using BI Publisher desktop to generate a template file.
Now that everything is in place a new report definition was created, the query, template and group were assigned to the definition, there were no need for any parameters for this report.

The report is available against the report group it has been assigned to.

When executing the report you have the option to generate in either PDF, HTML or Excel (XLSX)

I selected XLSX and depending on browser settings it will either open directly in excel or you will have the option to download and then open in excel.

So this can report can be generated at any time to provide up-to-date batch schedule information.
Finally on to running the activities such as creating a new schedule outside of the FDMEE UI, if you are not aware from 11.1.2.4.210 it is possible to use a REST resource to run tasks such as data load rules, batches, custom scripts and reports, I have covered the functionality in previous blogs if you would like to understand it in more detail.
To run a custom script you can make a post to the following URL format:
http(s)://<webserver>:<port>/aif/rest/V1/jobs/
The body of the post will need to include in JSON format the job type which will be REPORT, the report format type which will be SCRIPT, the job name which will be the name of the custom script to run and the parameter display names and values.
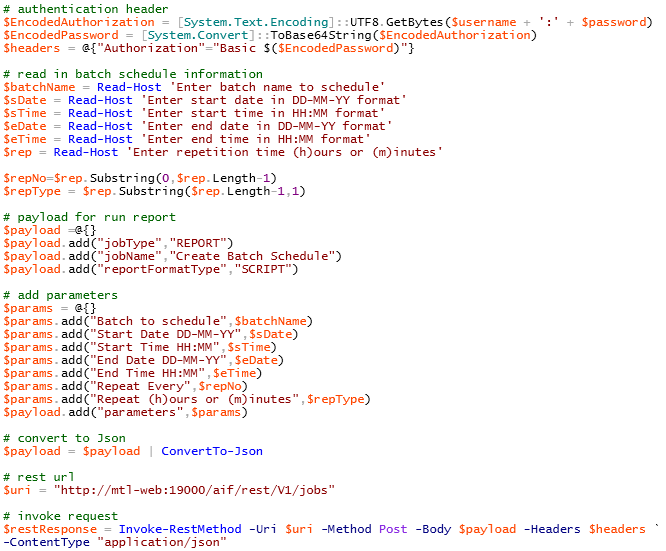
An example to run the script to create a new batch schedule using a REST client would be:

After the post has been made a response will be returned with FDMEE process information such as ID and status.

If the status is in a running state a GET request can be made to keep checking the status.

You could then convert this into a script which could be called by an automated process and parameters passed in or say run from a user’s client machine instead of having to log into workspace.
I created the following example script using PowerShell which uses the REST resource to run the custom script to create a new schedule, I know it requires error trapping but it just to give an idea.

Running the report again to view the scheduled batches confirm that the new schedule has been created.

Job done, a full solution to create, update, delete and view schedules.
In this post I want to continue where I left off and move on to updating, deleting and viewing active schedules, also look at the possibilities of running these tasks outside of the FDMEE UI.
Let us start off with updating an existing schedule, a custom script was registered which has parameters defined to select the schedule, set the start and end dates and repetition in minutes or hours. These parameters will be displayed when the custom script is executed and then passed into the jython script which will then update the schedule.
The parameter “SCHEDULE_ID” has been defined to call a query called “Batch Info”, this SQL query is against the ODI repository which hold the scheduling information, the query has been defined to return an understandable description and the ODI internal ID for the schedule, this ID is important as it will be used with the ODI Java API to access the selected schedule.
You will see the query in action when I execute the custom script which now appears in the UI under the “Custom Batch Scheduler” group it has been assigned to.
Executing the “Update Batch Schedule” script displays a window with the parameters that were defined in the script registration.
Now if select the schedule to update the SQL query comes into action and the script name, start to end date, repetition and schedule ID are displayed ready for selection.
It would be nice if there was the functionality to base a SQL query on the results of a SQL query but unfortunately that is not yet available in FDMEE so the remaining input fields need to input manually, as the schedule is being updated this is not much of an issue because you would need to enter new values anyway.
Now the new schedule information has been entered the script can be run and a custom message is displayed if the update was successful.
The process logs also display the status of executing the custom script.
The FDMEE log associated with the process contains the updated schedule information.
To prove the schedule has been updated I can switch over to the ODI console where it should have a new start date of 20th of August at 8am.
As I explained in the last part the end date has to be calculated and set as a maximum cycle duration, the execution cycle includes the interval between repetitions which correctly matches the value entered when running the custom script.
To prove the scheduling information had been update correctly I could have also just run the update schedule custom script again and selected the option to return the active schedules, this would have returned the updated values from the ODI repository.
What you do need to watch out for with populating parameter value fields is there is currently a 50-character limit, the SQL will return no problem, for example
As the above text is are over 50 characters then after selecting you would be hit with an unfriendly ADF error.

The magic to update the schedule is all handled in the jython script, the script follows the same concept as what I went through in the last part so there is no need for me to show all the script again.
The parameters values are stored, the schedule duration is calculated by finding the difference in minutes between the start and end date.

A connection is made to the ODI repository and then the schedule is returned by searching based on the ID that was passed into the script.
The values of the schedule are then updated to the ones defined when running the script, these values are then committed and the agent schedule updated.

So that is creating and updating schedules covered off, on to deleting a schedule.
Once again a custom script is registered, this time there is only the requirement for one parameter and that is to select the schedule to delete, the query is exactly the same as the one used in the update script.
After the script has been registered, it is available in script execution under the group which it was registered to.
When the script is executed there is one parameter available to select the schedule to delete.
Selecting the magnifying glass will run the SQL query to run all the active batch schedules.
I selected the first schedule in the list to be deleted.
A custom message is displayed if the delete was successful.
If I run the script again and view the schedules it confirms the schedule has definitely been deleted.
The jython script is much simpler this time as all that is required is to retrieve the ID of the schedule from the custom script parameter values, connect to the ODI repository, find the schedule by the ID, delete the schedule, commit and then update the ODI agent scheduler.
Just to recap that means with the custom scheduler solution we have the ability to create, update and delete schedules.
So how about viewing the active schedules, well you can certainly run the custom scripts like I have already shown to display the schedules but personally I don’t feel like is the nicest solution, what I did to overcome this was to create a report in FDMEE.
Before creating a report a SQL query was created and registered, the query was similar to one used in the update/delete scripts.
The query produces the following output that be used in the FDMEE report.
Once the query validated the generate XML button was selected, this produces an XML file which can be loaded into word using BI Publisher desktop to generate a template file.
Now that everything is in place a new report definition was created, the query, template and group were assigned to the definition, there were no need for any parameters for this report.
The report is available against the report group it has been assigned to.
When executing the report you have the option to generate in either PDF, HTML or Excel (XLSX)
So this can report can be generated at any time to provide up-to-date batch schedule information.
Finally on to running the activities such as creating a new schedule outside of the FDMEE UI, if you are not aware from 11.1.2.4.210 it is possible to use a REST resource to run tasks such as data load rules, batches, custom scripts and reports, I have covered the functionality in previous blogs if you would like to understand it in more detail.
To run a custom script you can make a post to the following URL format:
http(s)://<webserver>:<port>/aif/rest/V1/jobs/
The body of the post will need to include in JSON format the job type which will be REPORT, the report format type which will be SCRIPT, the job name which will be the name of the custom script to run and the parameter display names and values.
An example to run the script to create a new batch schedule using a REST client would be:
After the post has been made a response will be returned with FDMEE process information such as ID and status.
If the status is in a running state a GET request can be made to keep checking the status.
You could then convert this into a script which could be called by an automated process and parameters passed in or say run from a user’s client machine instead of having to log into workspace.
I created the following example script using PowerShell which uses the REST resource to run the custom script to create a new schedule, I know it requires error trapping but it just to give an idea.
When the script is run, it takes user input to define the parameters of the schedule which it then converts into JSON, makes a post to the REST resource and then keeps checking the status until the process has successfully completed.
Job done, a full solution to create, update, delete and view schedules.


